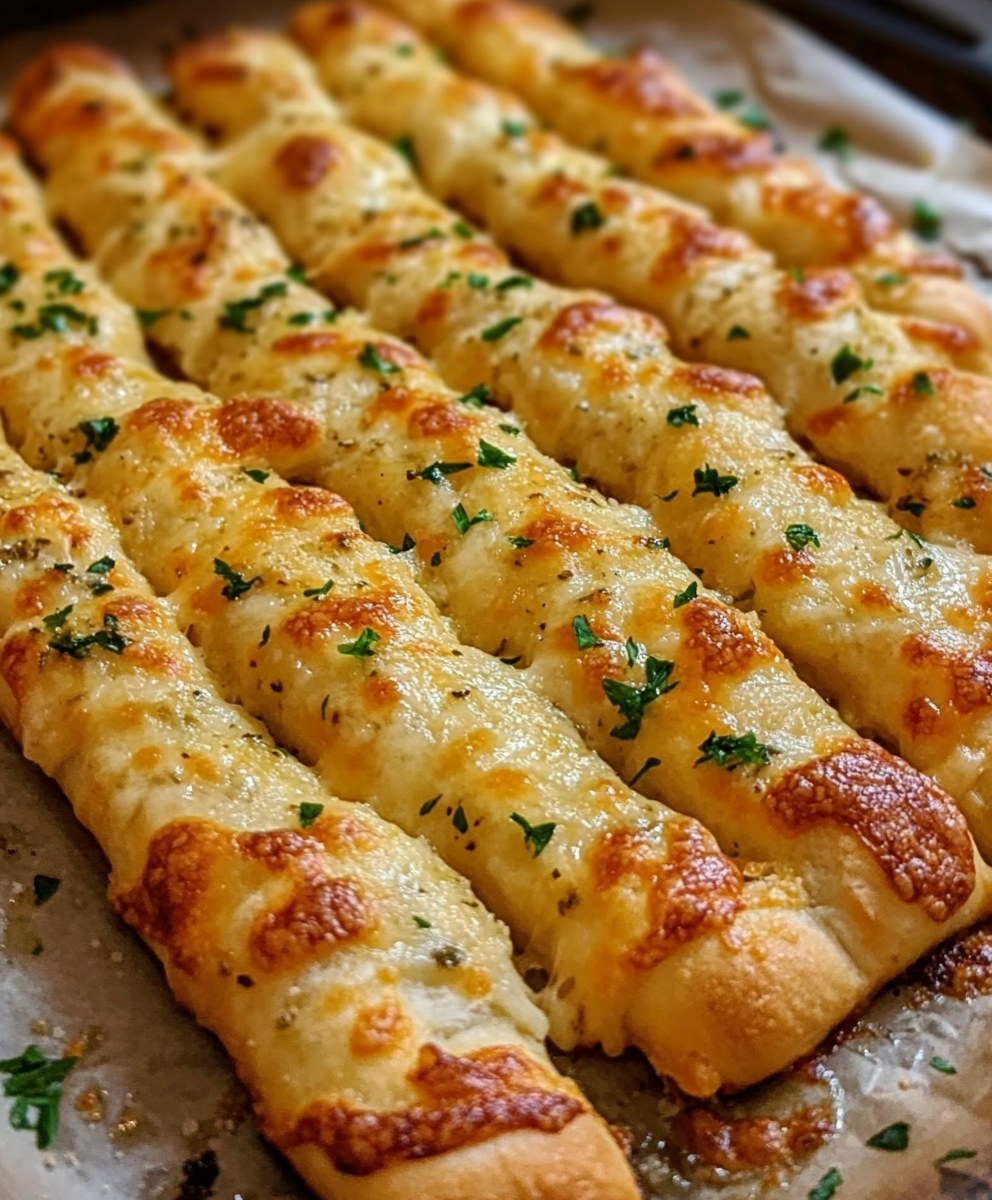
Description
Easiest cheesy garlic breadsticks recipe so that you can enjoy it any time of the year. These homemade breadsticks are crispy on the outside, soft on the inside, and loaded with gooey melted cheese and flavorful garlic butter. Perfect as a side dish, appetizer, or snack, they pair wonderfully with marinara sauce, pasta, or soup!
Who is This Recipe For?
This recipe is perfect for:
✔️ Cheese and garlic lovers craving a savory snack.
✔️ Anyone looking for a homemade breadstick recipe.
✔️ Families who enjoy a fun, shareable appetizer.
✔️ Those who love pairing breadsticks with pasta, soup, or dips.
Why It’s Great
✅ Easy to Make – Simple ingredients and quick preparation.
✅ Perfect Texture – Crispy on the outside, soft and cheesy on the inside.
✅ Versatile – Serve as an appetizer, side dish, or snack.
✅ Crowd Favorite – Ideal for parties, game nights, or family dinners.
Ingredients
For Bread:
- 1 ½ + 2 tbsp cup All-purpose Flour
- 1 tbsp Dry Instant Yeast
- 3 tbsp Unsalted Butter, cubed and at room temperature
- ½ tbsp Granulated Sugar
- 1 cup Lukewarm Milk
- 1 tsp Salt
- Lukewarm water as required
- Cornmeal for dusting
For Topping:
- 2 cloves Garlic, minced
- 2 tbsp Unsalted Butter, softened at room temperature
- 1 tsp Italian Herb Seasoning
- 1 1/3 cup Mozzarella Cheese, grated
- ½ cup Parmesan Cheese, grated
- Salt and Pepper, to taste
- A handful of Fresh Parsley, chopped
Kitchen Equipment Needed
✔️ Mixing bowls
✔️ Measuring cups and spoons
✔️ Fork or hand mixer
✔️ Baking sheet pan
✔️ Rolling pin
✔️ Pastry brush
✔️ Oven
✔️ Kitchen towel
Instructions
1️⃣ Activate Yeast – Mix the lukewarm milk with yeast, 2 tbsp of all-purpose flour, and sugar in a medium bowl. Let it rest at room temperature for 10 minutes. The mixture should become foamy and bubbly.
2️⃣ Prepare Dough – In a large mixing bowl, combine the flour and cubed butter. Using a fork or your hands, mix until the texture becomes crumbly. Add salt and mix well.
3️⃣ Knead the Dough – Add the milk mixture to the flour and knead, gradually adding lukewarm water as needed. Knead until smooth.
4️⃣ Let it Rise – Place the dough in a clean, deep bowl, drizzle with olive oil, and cover completely. Cover with a clean kitchen towel and let it rest for an hour or until doubled in size.
5️⃣ Prepare Topping – In a small bowl, mix garlic, butter, Italian herb seasoning, salt, and pepper.
6️⃣ Shape the Dough – Dust a baking sheet pan with cornmeal. Transfer the dough onto a floured surface, knead for 5-8 minutes, and roll it into a 1-inch thick rectangle. Gently place it on the prepared pan and spread it out with your fingers. Cover and let rest for 15-20 minutes.
7️⃣ Pre-Bake the Dough – Preheat the oven to 400°F (200°C). After resting, bake the dough for 15 minutes.
8️⃣ Add Toppings & Final Bake – Remove from the oven, brush with garlic butter, and sprinkle mozzarella and Parmesan cheese. Increase the oven temperature to 450°F (230°C) and bake for another 8-10 minutes until the cheese is melted and bubbly.
9️⃣ Serve – Remove from oven, cut into sticks, sprinkle fresh parsley over the top, and serve hot with marinara sauce.
Storage
Refrigeration: Store leftovers in an airtight container in the refrigerator for up to 3 days. Reheat in the oven at 350°F for 5-7 minutes for best results.
Freezing: Freeze unbaked breadsticks after shaping. Place on a baking sheet, freeze until firm, then transfer to a freezer-safe bag. Bake from frozen at 375°F for 20-22 minutes.
FAQ
❓ Can I use pre-made pizza dough?
Yes! Store-bought pizza dough works great for this recipe.
❓ What cheese works best?
Mozzarella and Parmesan are classic, but you can add cheddar or provolone for extra flavor.
❓ Can I make this without garlic?
Of course! Simply omit the garlic and use plain butter with seasoning.
Conclusion
These Cheesy Garlic Breadsticks are a delicious and versatile treat that’s perfect for any occasion. Whether you’re making them as a side for dinner, an appetizer for a party, or a snack for yourself, they’re guaranteed to be a hit. Try them today and enjoy every cheesy, garlicky bite!
Would you like to see a gluten-free version of this recipe? Let me know!