Description
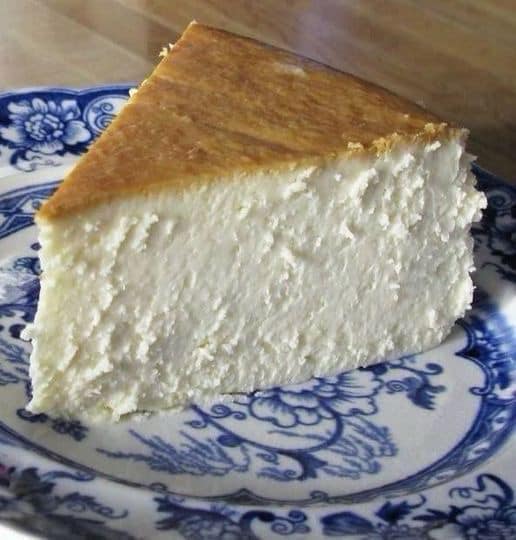
Indulge in this classic New York cheesecake, renowned for its rich, creamy texture and perfect balance of tangy and sweet. This recipe offers a foolproof way to make a bakery-quality cheesecake right at home, complete with a smooth, luscious filling and a golden top. It’s sure to impress any cheesecake lover!
Who is This Recipe For?
This recipe is perfect for dessert enthusiasts who love a decadent, creamy cheesecake with a hint of tang from lemon. Whether you’re baking for a holiday, special event, or a cozy family treat, this recipe will satisfy cheesecake lovers of all ages.
Why It’s Great
New York cheesecake is known for its dense and creamy texture, and this recipe delivers that and more! With simple ingredients and straightforward steps, it’s easy to make even for beginners. Baking it in a water bath ensures that the cheesecake stays moist and doesn’t crack, giving it a professional look and taste.
Ingredients
- 5 large eggs, at room temperature
- 2 cups (1 pint) sour cream, at room temperature
- 4 (8-ounce) packages cream cheese, at room temperature
- 8 tablespoons (1 stick) unsalted butter, at room temperature
- 1 1/2 cups sugar
- 2 tablespoons cornstarch
- 1 1/2 teaspoons vanilla extract
- 1 teaspoon fresh lemon juice
- 1 teaspoon grated lemon zest
How to Make New York Cheesecake
- Prepare the Pan: Generously butter the inside of a 10-inch springform pan. Wrap the bottom and sides with a double layer of heavy-duty aluminum foil to prevent water from seeping in during baking.
- Preheat the Oven: Set your oven rack in the center position and preheat to 300°F (150°C).
- Mix the Filling:
- In a large mixing bowl, beat the eggs and sour cream with an electric mixer until smooth.
- In a separate bowl, blend the cream cheese and butter until creamy. Add this mixture to the egg-sour cream mixture and beat until smooth.
- Add sugar, cornstarch, vanilla, lemon juice, and lemon zest, and beat thoroughly for about 2 minutes until all ingredients are well incorporated.
- Assemble for Baking:
- Pour the cheesecake batter into the prepared springform pan.
- Place the pan inside a roasting pan large enough to hold it without the sides touching.
- Carefully pour very hot tap water into the roasting pan until it reaches halfway up the sides of the springform pan, creating a water bath.
- Bake the Cheesecake:
- Bake for 2 hours and 15 minutes, or until the cheesecake is very lightly colored and a knife inserted in the center comes out clean.
- Remove the cheesecake from the water bath and carefully peel off the aluminum foil.
- Cool and Chill:
- Allow the cheesecake to cool completely at room temperature for about 4 hours.
- Cover and refrigerate overnight for the best texture and flavor.
Kitchen Equipment Needed
- 10-inch springform pan
- Heavy-duty aluminum foil
- Electric mixer
- Large mixing bowl
- Medium bowl
- Roasting pan (for water bath)
Storage
Store leftover cheesecake in an airtight container in the refrigerator for up to 5 days. You can also freeze individual slices by wrapping them in plastic wrap and placing them in a freezer-safe container for up to 2 months. Thaw in the refrigerator overnight before serving.
FAQ
What does the water bath do for the cheesecake?
The water bath (bain-marie) provides gentle, even heat, which helps prevent cracks and keeps the cheesecake moist and creamy.
Can I make this cheesecake in advance?
Absolutely! In fact, New York cheesecake tastes best after chilling overnight, allowing flavors to develop and the texture to set.
Why does my cheesecake have small cracks on top?
A few cracks are normal, but baking with a water bath and letting the cheesecake cool gradually will help minimize them. As it cools, the top will gently deflate, and most cracks will disappear.
Conclusion
This New York cheesecake is a timeless dessert that never fails to impress! With its creamy texture and subtly tangy flavor, it’s the ultimate treat for any occasion. Follow these steps, and you’ll have a stunning, bakery-worthy cheesecake to enjoy with friends and family.


